
In this tutorial I’ll explain how authentication for Google APIs works, and walk you through the process of authorizing a Tweakstreet flow to use the Google Sheets API.
This tutorial has three parts:
- One-time setup of Google Auth 2.0 authentication
- Authorizing your Tweakstreet flows to make API calls
- Performing a Google API call
Part 1: One-time setup of Google OAuth 2.0 authentication
Google’s APIs use the OAuth 2.0 authentication framework. Oauth 2.0 makes it possible for users to authorize certain apps to make certain API calls on their behalf.
In order use Google APIs, you have to establish your data project as an app with Google. This makes it possible for Google users - including yourself - to authorize the project to call Google APIs on their behalf, for example to interact with their Google Sheets documents.
Creating an app is completely free. It is merely a necessary component in the OAuth 2.0 framework.
This is a one time setup process. Once the app is created Tweakstreet flows can use it for authorization of API calls.
Create an App
To create an app, log in to your Google account and visit https://console.developers.google.com/
Create a new project and give it a descriptive name. I’ve called mine: “Tutorial-Project”. Once the project is created, you can view your new project’s dashboard.

Enable the APIs for your project
You must next choose the APIs that this project can ask authorization for. Click on Enable APIs and Services and choose the Google Sheets API. Pick any additional APIs as required.

Create an OAuth 2.0 Consent Screen
The Sheets API, like most Google APIs, requires authentication through OAuth 2.0. We’re going to set this up now.
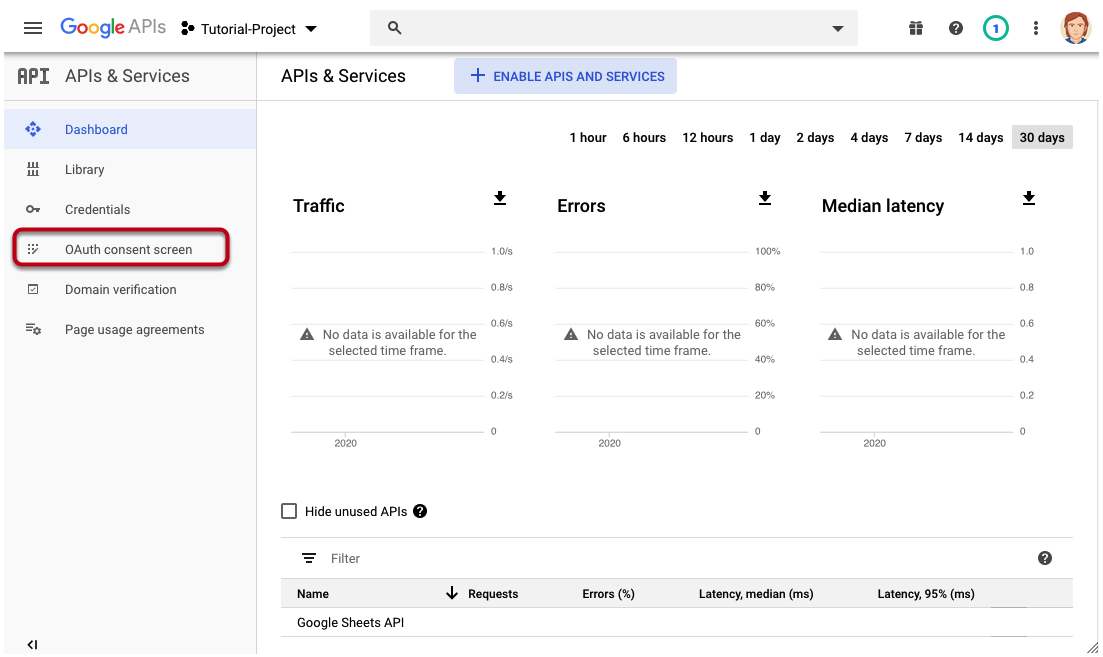
Go back to your Project dashboard and click on OAuth consent screen.
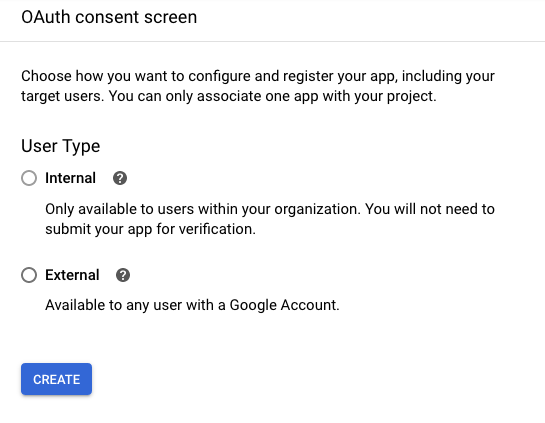
You will be prompted to decide the type of app you’re creating.
-
If you have a business account with Google, you can make your app internal, meaning that it will be only visible to members of your organization.
-
If you have an individual account, your app will be public, and all Google users can potentially authorize it to act on their behalf.
If you choose this option Google will limit the amount of users that can authorize your app to 100 accounts, and show a security warning to everybody who is authorizing this app, including yourself. For private use, the limit of 100 accounts should not be a problem, and the security warning is just something you have to live with.
Configure the Consent Screen
Provide a descriptive application name.
You also need to specify permissions - also called scopes - the app can ask for.
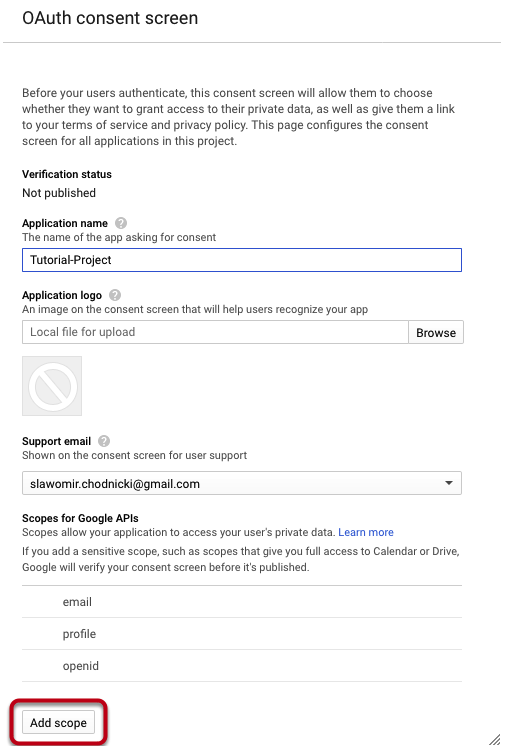
The documentation of every API method lists the scopes that enable its use. For example, the spreadsheets.values/get method requires that the app is authorized under one of the following scopes:
https://www.googleapis.com/auth/drivehttps://www.googleapis.com/auth/drive.readonlyhttps://www.googleapis.com/auth/drive.filehttps://www.googleapis.com/auth/spreadsheetshttps://www.googleapis.com/auth/spreadsheets.readonly
For this tutorial, I’ll just add the https://www.googleapis.com/auth/spreadsheets.readonly scope, which allows read access to Google sheet documents. In general, you must add all the scopes required to use the APIs you want to call.
Save your consent screen after adding the scopes.
Create App Credentials
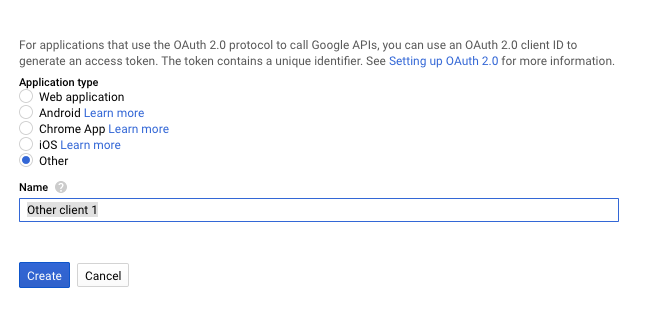
Navigate to the credentials section and create OAuth client ID credentials.

On the next screen choose “other” for application type.
Once the credentials are created you might get a popup informing you of the generated client ID and secret. You can dismiss the dialog for now.
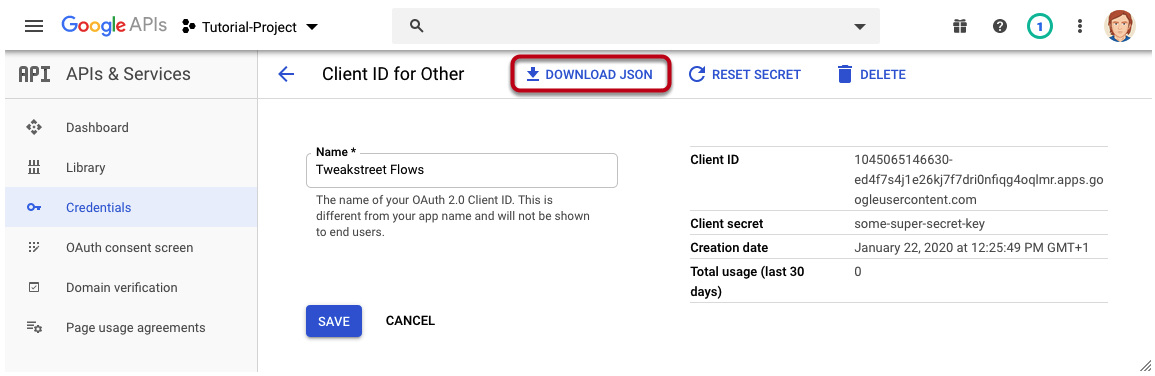
Downloading App Credentials
Clicking on your generated credentials leads to a detail screen where you can download the generated credential details as a JSON file.
You have now completed the OAuth 2.0 setup process.
Part 2: Authorizing your flow to use Google APIs
We’ll create a data flow that is authorized to make calls to the Google API.
The steps are:
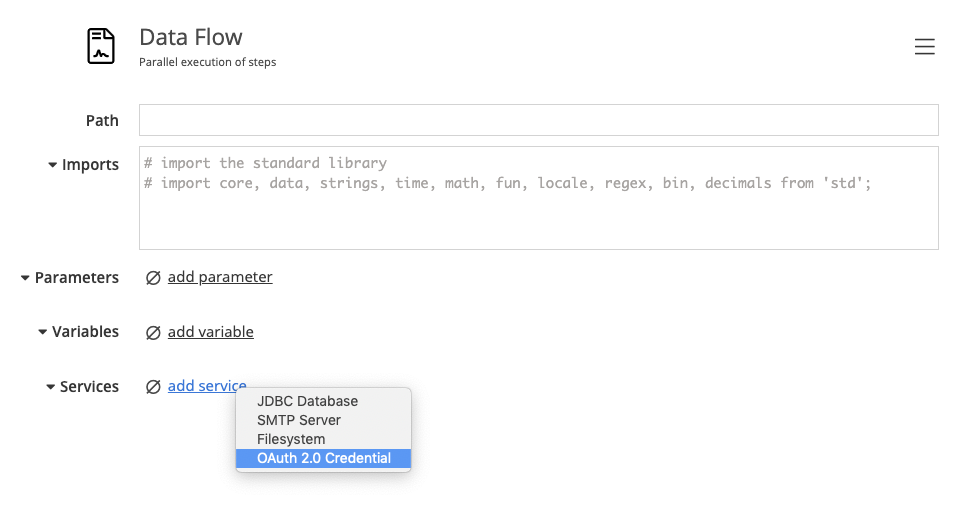
- Create a new data flow and save it
- Open flow properties and create a new OAuth 2.0 credential in the services section
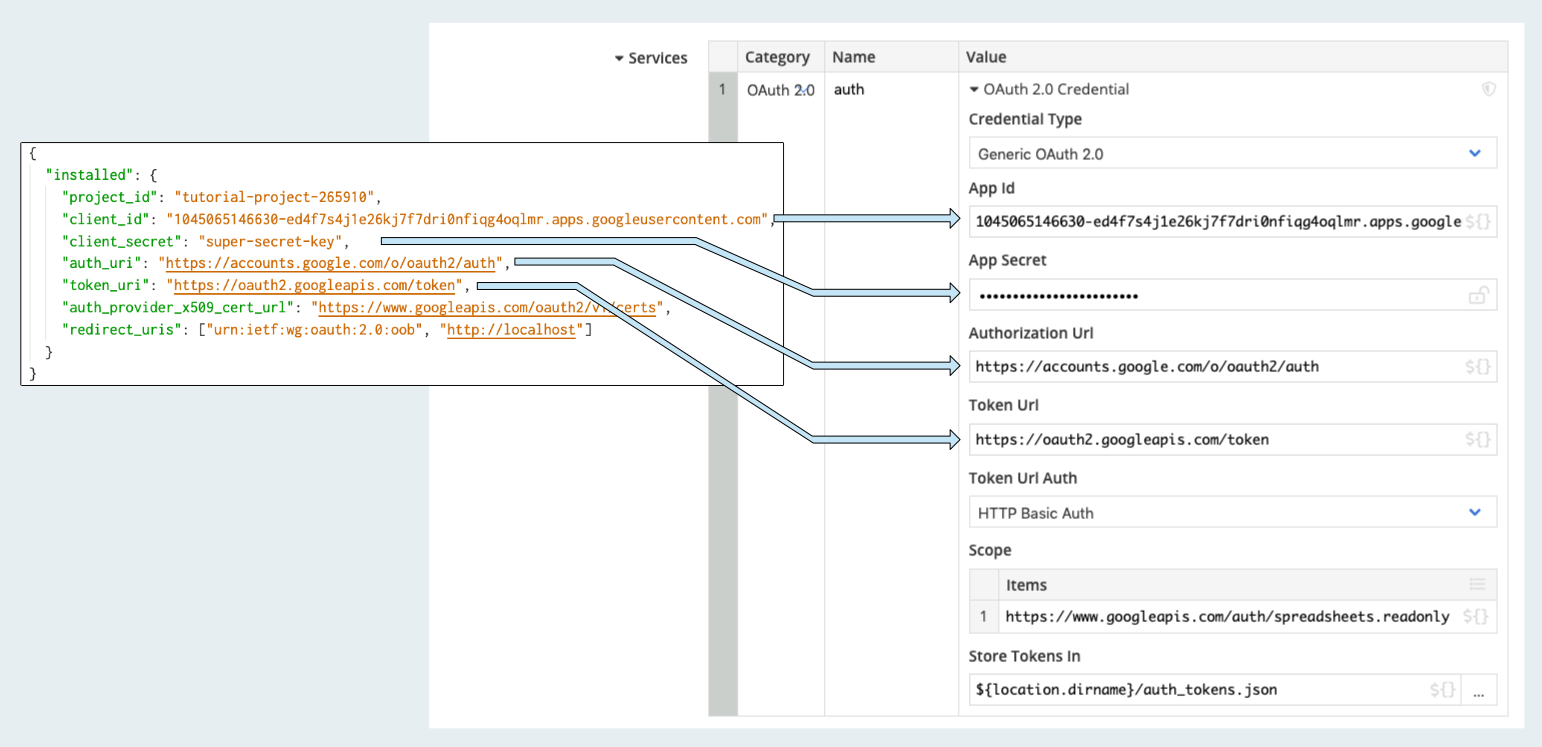
- Click open the OAuth configuration and fill in the information from your Google credential JSON file as follows:
-
Provide the scope items you want to authorize. This must be a subset of the scopes that the app is configured for in the Google console. Use
https://www.googleapis.com/auth/spreadsheets.readonlyto authorize read access to sheets documents. -
Make sure to provide a valid path to store tokens in. OAuth tokens are time-limited security tokens dynamically generated by Google that Tweakstreet needs to keep track of. If you wish to keep the tokens file next to the data flow file, specify a path relative to the flow location such as:
${location.dirname}/auth_tokens.json -
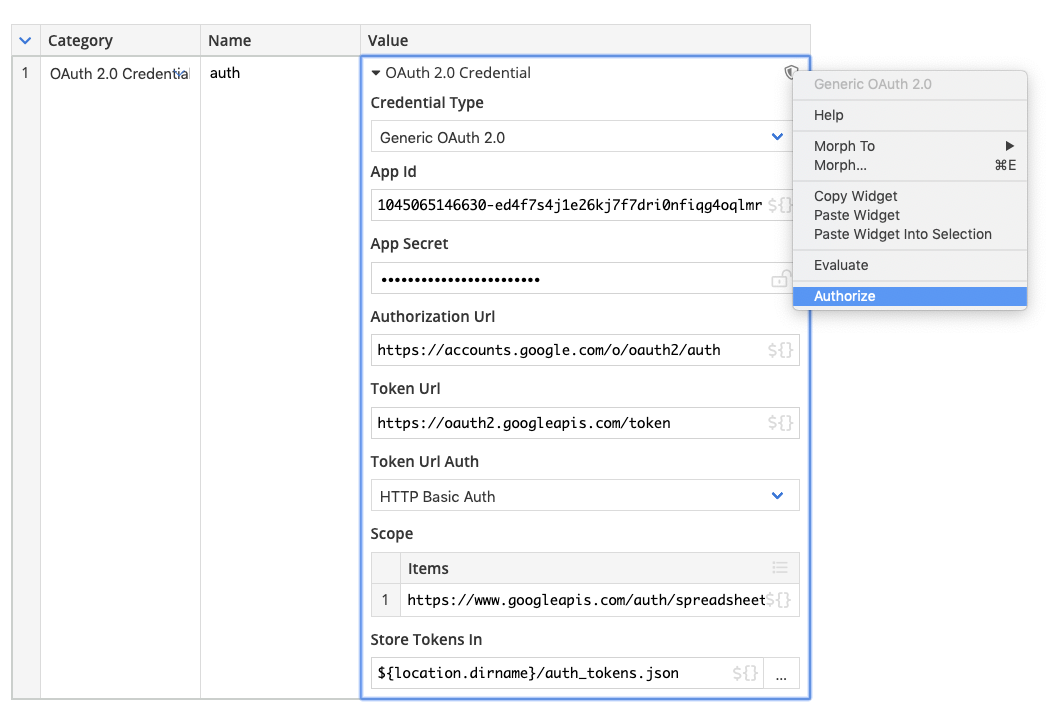
Pick “Authorize” from the context menu to authorize your flow to use the Google API on your behalf.
Tweakstreet needs to see the authorization response from Google, which is why it temporarily starts a local webserver during the process that Google will redirect to.
Once you start the authorization you will be prompted by Google to grant your app permission to use the specified scopes. If you created a public app while setting up Google OAuth you will be warned that the app is not verified by Google.
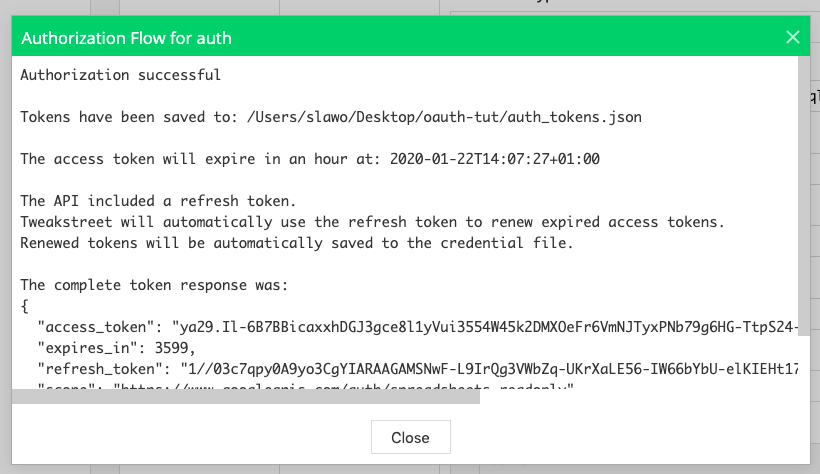
Once you grant permission, Tweakstreet will contact Google to obtain the tokens used for authorization during API calls. Tweakstreet will show you a summary of the result.
-
The OAuth 2.0 tokens needed to authenticate API calls are now saved to a local file. You can use the same OAuth credential configuration in all flows that need it to make any API calls. You only need to authorize once. Just make sure to point each flow to the same tokens file.
-
Close the authorization results message and confirm the flow properties dialog. You can now use all authorized Google APIs through the HTTP Request step.
Part 3: Calling Google APIs using the HTTP Request step
We’re going to read data from this public sheet:
Looking at the documentation for spreadsheets.values/get we learn the following:
We need to call
GET https://sheets.googleapis.com/v4/spreadsheets/{spreadsheetId}/values/{range}
- our spreadsheetId is
1BxiMVs0XRA5nFMdKvBdBZjgmUUqptlbs74OgvE2upms - for the range, we want the data cells only, omitting the headers, let’s go with
A2:C31

Configuring the HTTP Request Step
Let’s create a HTTP Request in our data flow and configure the call:
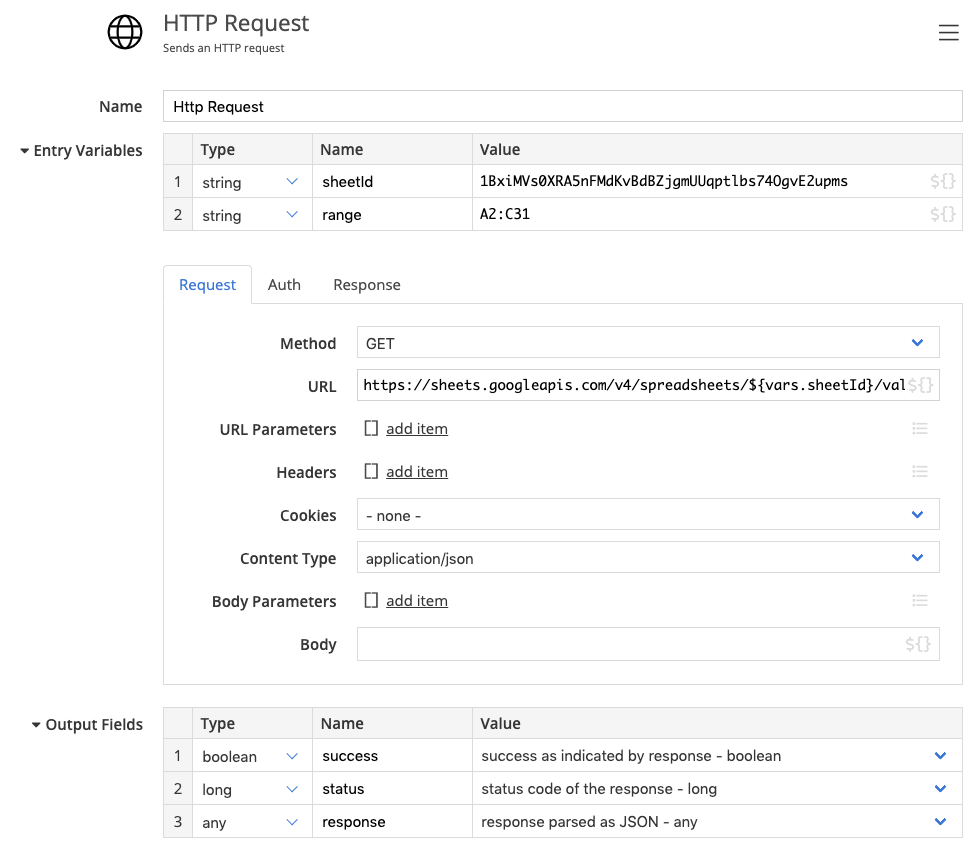
I’ve put success, HTTP status and the parsed JSON response into output fields.
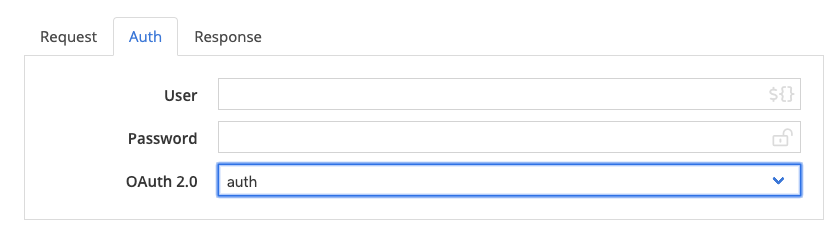
On the Auth tab, make sure to pick the OAuth credentials we’ve configured earlier for authentication.
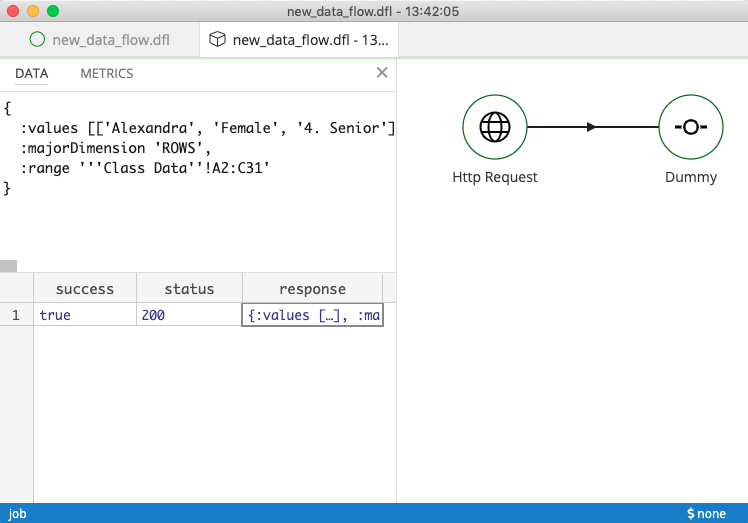
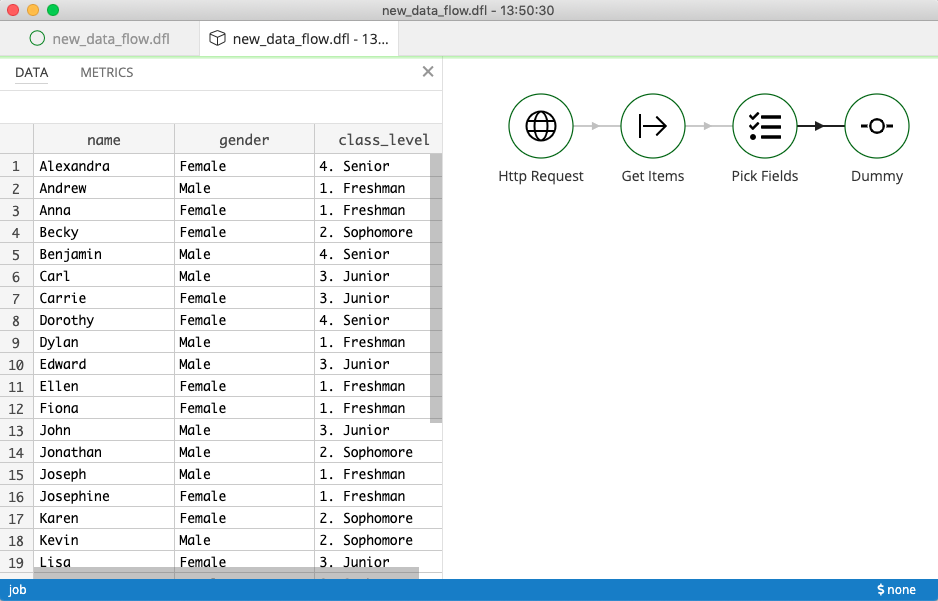
Connect a dummy step, and run the flow. You should see the data coming through successfully.
Generating Result Rows
The API response gives us result rows as a list at the key values. Each row is a list of field values.
We can use the Get Items step to iterate over rows present in values and generate the three fields we’ve read.
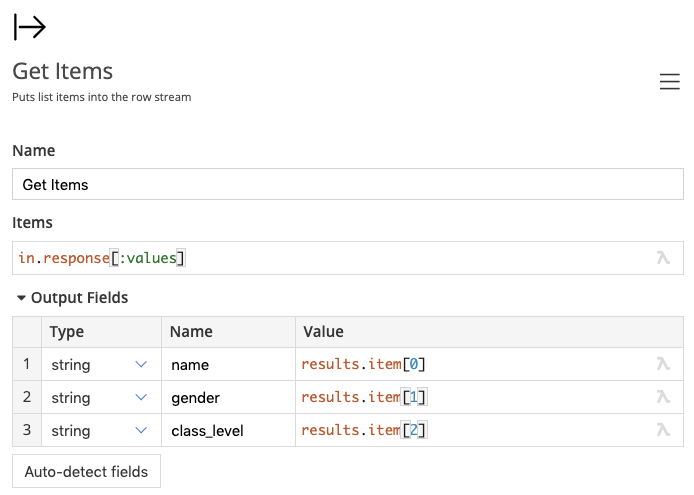
Then we add a Pick Fields step to retain only the extracted fields, and the final result are the rows as present in the sheet:
Congratulations. You can now use Google APIs for data automation!